Creating your own diecast police car is a rewarding hobby that combines craftsmanship with a touch of nostalgia. Whether you are a seasoned model maker or a beginner, this guide will walk you through each step, from gathering materials to applying the finishing touches. With patience and attention to detail, you can transform a simple diecast model into a stunning replica of a police cruiser. This process involves several stages including material collection, model preparation, painting and decal application, and finally, reassembly with some additional detailing. This guide aims to provide a clear, concise approach, ensuring a satisfying and enjoyable experience that results in a unique addition to your collection or a fantastic gift for any enthusiast.
Gathering Your Materials
Before you begin, gathering the right materials is essential for a successful project. This includes everything from the diecast model itself to the paints and tools required. Proper preparation and the use of the correct materials will significantly impact the final outcome. By assembling all the necessary components beforehand, you’ll avoid interruptions during the process and ensure that each step is completed efficiently. This also lets you focus on the creative aspects of the project, such as color schemes, decal placement, and finishing details.
Essential Tools
You’ll need a set of tools to help take apart, paint, and reassemble your diecast police car. These tools are crucial for the precision required in model making. A small screwdriver set with various head types (Phillips head and flathead) will be necessary for disassembling the car. Hobby knives or X-Acto knives are ideal for detail work, decal trimming, and removing any imperfections. Fine-grit sandpaper (ranging from 400 to 1000 grit) is perfect for smoothing surfaces and preparing the model for painting. Additionally, tweezers are useful for handling small parts, such as decals or accessories, with precision. These tools help guarantee accuracy and provide the best results.
Diecast Car Model

Choose a diecast model of a car that you like or has the potential to be a good police car replica. Start with a suitable base vehicle. Consider the scale, with 1:18, 1:24, and 1:43 scales being popular choices. Look for a model that offers easy disassembly and good detail. Avoid models with complex designs. A simpler model will be easier to work with, especially if you’re a beginner. You can find these models at hobby stores, online retailers, or even at flea markets. Before you start, check the model’s surface for any imperfections that might affect the final finish.
Paints & Finishes
The right paints and finishes are essential. Acrylic paints are recommended because they are easy to work with, dry quickly, and are available in a variety of colors. Choose colors that match the police car you want to replicate. You’ll need a base color (like white, black, or blue), and any accent colors, like silver or gold, for details. A primer is crucial for the paint to adhere to the metal surface. A clear coat is necessary to protect the paint and give the car a glossy finish. Don’t forget to get paint thinners or removers for cleanup and any necessary airbrush equipment if you want a professional-level finish. Also, consider buying a gloss coat and a matte coat for different areas of the car to give it a realistic look.
Preparing the Diecast Car
Proper preparation is key to a flawless finish. This involves disassembling the model, cleaning it thoroughly, and preparing the surface for painting. This process removes any existing paint and imperfections, providing a clean slate for your custom design. It’s an important step because it affects how well the new paint adheres to the model. Neglecting any of these steps can lead to a poorly finished product. The better you prepare the car, the better it will look once you apply the final touches. Take your time, and be careful to ensure no damage happens to the components.
Disassembly and Cleaning

Before you start painting, carefully disassemble the diecast model. Use the appropriate screwdrivers to remove screws and detach parts. Take photos of the car before you start, it helps during reassembly. Remove all the wheels, windows, interior pieces, and any other detachable parts. This will allow you to paint each component separately. After disassembly, clean the parts with soap and water to remove any dirt, oils, or debris. Ensure all components are dry before the next steps to prevent moisture from interfering with the painting process. Take your time and organize the parts carefully to avoid losing them.
Surface Preparation
Prepare the surface of the diecast car for painting. Start by lightly sanding all the surfaces to remove any existing paint and create a smooth surface for the primer. Use fine-grit sandpaper (400-600 grit) to avoid scratching the metal. After sanding, clean the surface with a degreaser to remove any residue. Apply a thin layer of primer, following the manufacturer’s instructions. Primer helps the paint adhere better and covers small imperfections. Once the primer is dry, lightly sand it again to ensure a smooth finish. This preparation will ensure that the paint adheres properly and gives your police car a professional look.
Painting Your Police Car
The painting phase is where your vision for the police car comes to life. Proper painting techniques are critical for achieving a professional-looking finish. This involves applying the base coat, adding decals and details, and finally, applying a clear coat. Each of these steps requires precision and patience. A well-executed paint job will make your diecast car look realistic and professional. Remember to work in a well-ventilated area, and follow the instructions on your paints and materials.
Base Coat Application

After the surface preparation, apply the base coat. Apply thin, even coats of paint, allowing each coat to dry completely before applying the next. Use an airbrush for a smoother finish, or a spray can if you are more comfortable with it. Holding the airbrush or spray can a consistent distance from the surface is vital to avoid drips or uneven coverage. Apply the paint in several thin layers rather than one thick layer. This method reduces the risk of runs and ensures the color is uniform. Once the base coat is completely dry, inspect the surface for any imperfections and touch them up as needed.
Adding Decals and Details
Adding decals and details is the next crucial step to replicate a realistic police car. This includes decals such as police badges, unit numbers, and emergency lights. You can either purchase pre-made decals or create your own using decal paper and a printer. Carefully apply the decals to the car, using tweezers to position them accurately. Ensure the decals are smooth and without air bubbles. For the details, use fine brushes to paint details like trim, lights, and any other features. Once the decals and details are in place, let everything dry completely before applying the clear coat.
Applying Clear Coat
The clear coat protects the paint and gives your police car a glossy finish. Apply a thin, even coat of clear coat over the entire model, following the instructions on the product label. Multiple thin coats are better than a single thick coat to prevent runs and drips. Allow each coat to dry completely before applying the next. Once the clear coat has dried, the surface should be smooth and glossy. If there are any imperfections, you can lightly sand them with fine-grit sandpaper and apply another coat of clear coat. This final step protects the paint and gives your model a professional, polished appearance.
Reassembly and Finishing Touches

The reassembly and final touches complete the process. After the paint has completely dried and cured, you can begin reassembling the car. This involves carefully putting back all the parts you removed earlier. It is also the time to add accessories to enhance the realism of your diecast police car. This final stage is very important because it brings everything together. Careful and patient reassembly ensures that your hard work pays off, resulting in a beautiful, custom-made diecast model.
Reassembling the Car
Carefully reassemble the diecast car, following the steps in reverse order from the disassembly process. Use the photos you took before disassembly as a guide. Ensure all parts fit snugly and securely. Reattach the wheels, windows, interior pieces, and any other detachable components. Make sure all screws are tightened and all parts are properly aligned. If any parts seem difficult to fit, double-check your work and make sure you’re following the correct sequence. Patience and attention to detail are key here. Take your time and make sure everything is put back together correctly.
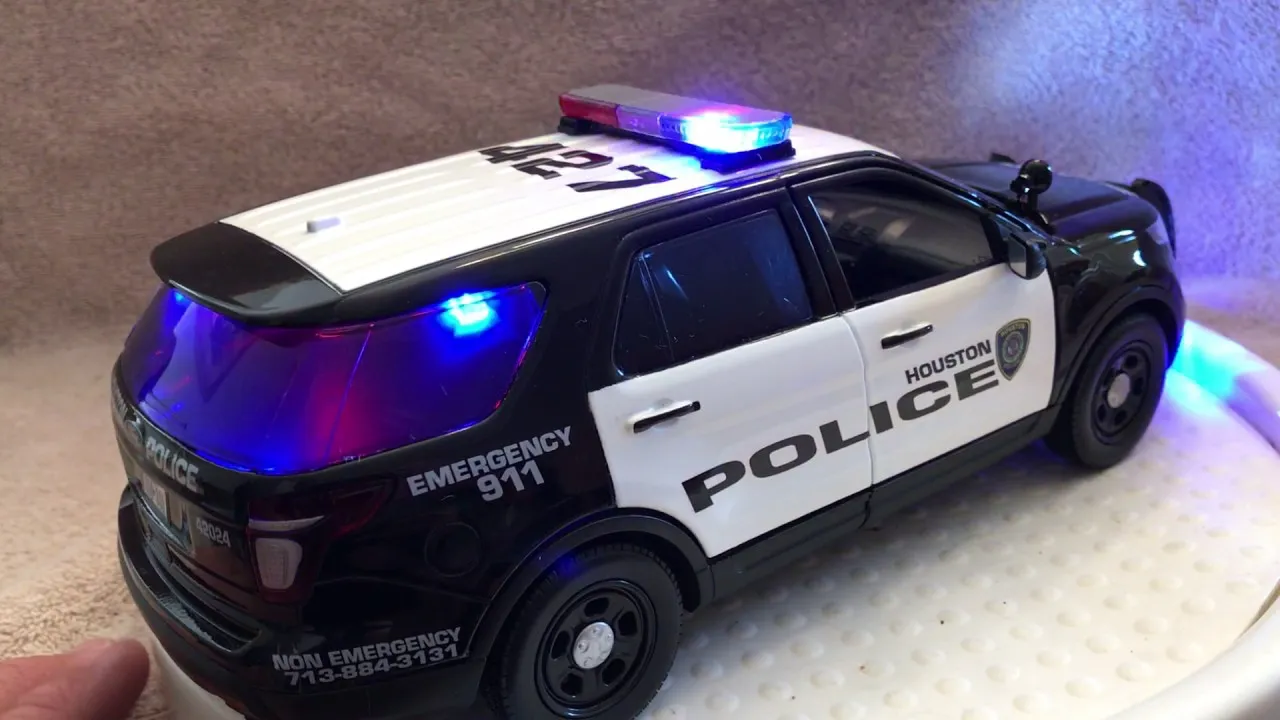
Adding Accessories
To add a final touch of realism, consider adding accessories. This might include custom lights, sirens, and antennas. You can find these accessories at hobby stores or online retailers. If you’re feeling ambitious, you could even try to install working lights. Adding accessories can significantly enhance the realism of your diecast police car. It will help you create a miniature version of the car you’ve always admired. This final step allows you to personalize your model and make it truly unique. Enjoy your completed custom diecast police car!
Making your own diecast police car is a rewarding hobby. It is a perfect blend of craftsmanship and creativity. By following these steps, you can transform a simple model into a stunning replica. Remember to take your time, use quality materials, and enjoy the process. Whether it’s a hobby, a gift, or a part of your collection, the effort put into the project will be well worth it. Happy crafting!